
Get a Grip!

When you're training your upper body, it's easy to get dialed in on the big, burning muscles of the arms, shoulders, chest, and back. You probably don't spend much mental energy thinking about what your hands are doing. But the way you hold your hands has everything to do with the effect of your exercise!
As humans, our hands are one of our superpowers. There’s no more versatile appendage on the body. Here’s a fun test. Choose something in your area — a pen, a cup, etc… and see how many ways you can pick it up.
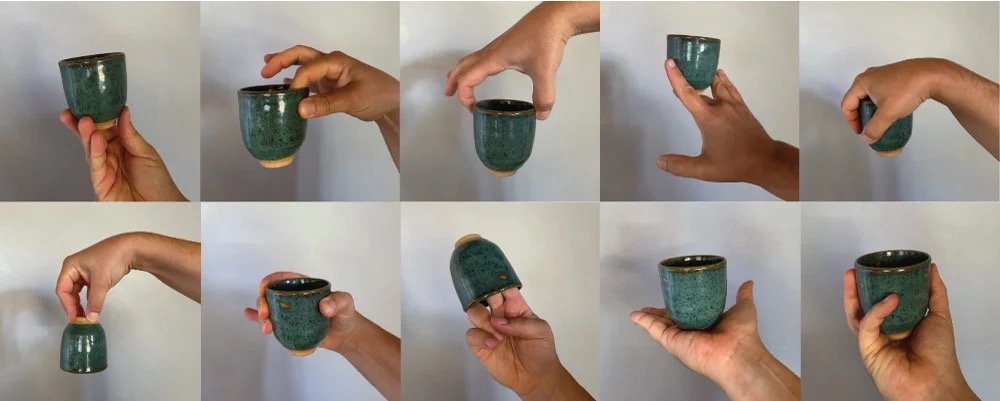
You’ll see that you can pick up the object from any angle. Front, top, side, bottom. You can hold it with your entire hand, just two fingers, or even with just the small muscles of the palm. And once you have the object in hand, you can manipulate it to any angle and orientation you can dream up. True, 360° control along every axis. Hands are neat.
Now, continue manipulating the object, but this time put your focus on all the muscles or the arm, shoulder, chest and back that are working behind the scenes to put the hand just where it needs to be. There are hundreds of muscles pulling the strings beneath the surface of your skin, articulating joints and bones in just the right way to give such exquisite motor control. Many of the muscles of the upper body are dedicated entirely to making hand movements smooth and diverse.
This relationship between muscles and hands works the other direction too. When you want to train a muscle of the upper body, the way you hold your hand will dictate which muscle is targeted. Different hand positions lock out different lines of muscle, creating the chance to hone in on exactly the muscle group you want, just by getting your grip right.
In this article we’ll go over 5 essential upper body exercises and show how different grips change the muscular effect. The goal of this lesson isn't to give you a guide to every exercise grip (that would be a book in itself), but to show you how important hand position is. When doing any work with the arms or shoulders, pay attention and choose the right grip for the job. Good form and attention to detail will get you more bang for your buck!
This lesson will default to plain-English names for the muscles. We've found that the second a latin muscle name comes on the scene (like brachioradialis, the muscle responsible for rotating the radius bone), people immediately feel overwhelmed and tune out. Getting the right grip isn't rocket science, so we'll keep it nice and breezy. To really get what we're talking about, grab a weight or resistance band and feel how these different grips change which muscle is activated in your own body.
1. The Curl
This exercise is the classic biceps builder, and perhaps the most recognizable resistance exercise in the world. Curls can be done with a dumbbell, cable system, or resistance band. They're a great place to start understanding how your grip changes the nature of the exercise.
Palm-up Grip


This grip will hit the biceps directly. You can feel how the biceps pop out when you hold the hand in a palms-up position (as if you were holding a bowl of soup from the bottom). The palms-up grip limits how much the rest of the arm and shoulder can help, creating bigger burns in the biceps. This grip can create a higher “peak” on the biceps, but only after a lot of time and training.
Hammer Grip


Turning the palm as if you were holding a hammer lets the muscles of the forearm and the support muscles under the biceps get in on the action. You’ll still be working the main biceps, but not in as much isolation as the palm-up grip. The hammer grip will give you visibly bigger arms, as the muscles under the biceps fill out and push the biceps up. The shoulders will also get a workout with this grip, resulting in a more general arm exercise.
Palm-down grip


Rotating the hand all the way around locks out 95% of the biceps pulling power (this is because the radius bone where the biceps attach is torqued over, preventing a clean line of muscular power). With the biceps locked out, the forearm is stranded and has to do the bulk of the lift by itself. With this grip you’ll have much less power and should dial down the resistance accordingly.
You can also get a blend of these grips with something like an EZ-bar which keeps the wrists at a comfortable angle, or by rotating the hand as you lift, starting from hammer and ending in palms up.
If you had to choose only 1 grip?
When in doubt, the best option is the classic palms-up grip. If you’re doing a curl, you might as well isolate the target biceps to the maximum extent, knowing that you’ll be hitting the helper muscles like the shoulders and forearms in other exercises that target them specifically.
2. Triceps extensions
“Triceps extension” is a general term for any exercise where you’re taking the arm from a bent position to a straight position against resistance. This action uses the packet of three muscles on the back of the arm called the triceps. The triceps are often overlooked for their flashier companion, the biceps, but good-looking triceps are actually more aesthetically important for the arm. When you’re walking down the street with your arm relaxed and swinging, it’s the triceps that people will see, not the biceps. You can do triceps extensions with dumbbells, a resistance band, or with a cable pulley system.
All grip variations of the triceps extension are good for hitting the triceps. The difference is in how easy it is to recruit helper muscles that can take away isolation from the target.
Palm-down grip


This grip gives you mechanical advantage because you’re able to lean in and push down against resistance, recruiting the front part of the shoulder and your bodyweight to help. However, this can be abused (often subconsciously) to make later reps easier, when the triceps are burning up and your mind wants the pain to stop.
Hammer grip


Holding with a hammer grip gives a very comfortable, natural range of motion. If your form is strict you'll get a great triceps workout, but if you're fatigued or sloppy you'll find this grip lets you lean in and overuse the shoulders and back at the expense of triceps stimulation.
Palm-up grip


This grip feels the most awkward, but lends itself best to good form. Because your hands aren’t hooked over the grip, you can’t really lean into the motion. The open-rotated arm position also does a good job of locking out the chest, shoulder, and back muscles, leaving the triceps to work in better isolation.
There are also things like v-bars and triceps-rope which give you a mix of these different grips.
If you had to choose only 1 grip?
Palms-up wins this one, not because it’s particularly more targeted on the triceps, but because it makes it easier to not let other muscles pitch in without you realizing it.
3. Push-ups
At Kenzai we always recommend doing push-ups with push-up bars. It’s fine to once in a while do a “drop and give me 20” with your bare hands, but if you’re doing push-ups as part of a consistent plan, push-up bars make a huge difference. The good news is any old pair of bars will work, or, in a pinch, a pair of stable dumbbells.
Push-up bars do two things. First, they protect all the small bones of the wrist which don’t love the way push-ups force them to hold your body weight at a sharp 90° angle. With a push-up bar, you’re able to make a fist, which recruits all the solidifying muscles of the forearm, protecting the delicate wrist bones from wear and tear.
Second, push-up bars allow you to go deeper into the push-up, significantly increasing your range of motion and subsequent muscular development.
Push-ups are a compound movement, recruiting the biceps, shoulders, back, and of course the chest muscles. The ratio of recruitment between these groups depends on your hand position.
Let’s assume you have push-up bars. You’ll notice that the bars easily help you visualize the different positions for your hands. We think of these as 180°, 90°, and 45°.
180° grip


This is a nice grip because it replicates what you’d be feeling with a barbell bench press. We often think of the push-up as doing an upside-down bench press, except instead of pushing up a bar, you’re pushing the whole planet away from you. It sounds funny but this image really helps you feel how the push-up works.
The 180° hand placement is great for limiting how much the biceps and shoulders can help, truly isolating the entirety of chest muscles. This makes the movement much more difficult and you’ll be able to complete fewer reps, especially as a beginner. This position also puts the shoulders under the greatest amount of stress, as the top of the push-up leads the rotator cuff and scapula into extremes of their range of motion.
90° grip


This is the opposite end of the spectrum, really letting your biceps and shoulders punch into the ground and provide a lot of power. You’ll feel big, meaty burns with this hand position, but will get less chest activation. This grip turns the push-up into much more of an arm-builder than a chest-builder.
45° grip


This splits the difference between the two, the arms and shoulders will get a good pump, but the chest is working right alongside, with the back also doing some load balancing as the different muscle groups switch on and off.
If you had to choose only 1 grip?
The 45° grip is the best choice here, as it provides an anatomically smooth range of motion and spreads the muscle stimulation across a good range of muscles without over-emphasizing any one in particular. This is a recipe for a toned, confident upper body!
4. Rows
A row is any motion where the arm is drawing back against resistance, driving from the shoulder rather than the elbow. Rows hit the often-overlooked lat muscles running down the rear edge of your back. If you flare your back to be as wide as it can be, it’s your lats that are doing the “flaring.”
The lats are tricky muscles. They have the largest surface area of any muscle of your body, and are designed to spread loads around. Because of this, it’s difficult to isolate them, and really challenging to get them into a deep burn. You’re familiar with the way your arms, shoulders, or legs can burn hot and cause you to take a break to recover, but you've probably never had to stop exercising because your lats were on fire.
For this grip comparison we’ll look at a simple downward row, but the same applies to all rows, be them on a machine, barbell, or free weights.
Palm-up Grip


This grip feels the most awkward, as in regular life you rarely pull something heavy towards you with a palms-up grip. The shoulder is mostly locked out, but the lower section of the lats is also at a disadvantage. This leaves the work to your upper lats and all the small helper muscles around the shoulder blade and mid-back. You’ll find you’re able to pull less weight with this grip, across a narrower range of motion.
Hammer Grip


For rows, the hammer grip gives you the most natural, deepest range of motion, the biceps and shoulder are able to contribute and really drive the elbow back. This extra bit of “oomph” lets you work the entire lat evenly — at the start of the rep you’ll feel the lower lat, the middle of the rep hits the mid-lat, and the deep-finish hits the upper-lat.
Palm-down grip


Rotating to a palm-down grip does a good job of locking out the biceps, shoulder, and upper area of the lat. What you’re left with is a strong engagement of the lower lat and midline of the back. This is often what bodybuilders want as they try to increase size and shape of the lower lat to fill in the blank space of the lower back. This position is also close to what you’d be doing in actual rowing, because it allows the most lean back and extension of the lower body.
If you had to choose only 1 grip?
The Hammer grip is the most balanced of the grips, working the entire lat and upper back in good measure. It’s also the least stressful for the shoulder joint, letting you add extra resistance (which you'll need to train the stubborn, strong lats).
5. Pull-ups
The mighty pull-up is an amazingly effective compound movement for the entire upper body. If you can, install a pull-up bar in your home and do pull-ups throughout the day. Use a small stool or chair to rest a foot on if you can’t do a complete repetition yet. The assisted pull-up machines in the gym are a great resource if available. A life with pull-ups in it is a strong and healthy life indeed.
The pull-up is unusual because the target muscle completely changes based on grip position. This leads to a lot of confusion. Let’s clear it up.
Underhand Grip


Grabbing the bar from underneath, with the fingertips pointing back at your face is often called a pull-up. But in the fitness world, this hand position means you're doing a chin-up, not a pull-up The chin-up grip targets the biceps and chest, with the upper back contributing only at the top of the movement. This is fine, except that you’re missing the life-changing back-strengthening effects of the real pull-up. There are better biceps and chest exercises than the chin-up, and you’re better off using your time at the pull-up bar doing real pull-ups.
Neutral grip


This is the hammer grip of pull-ups. You’re holding the two bars in the most natural way, which unlocks the powerful, organic muscle lines of the biceps and shoulder. This makes you feel really strong, but it too lets the back off easy. As with the underhand grip, there are better shoulder and biceps moves than neutral grip pull-ups.
Often, when someone says “I can do 20 pull-ups,” they’re talking about chin-ups or neutral grip pull-ups. Those aren’t pull-ups!
Overhand grip

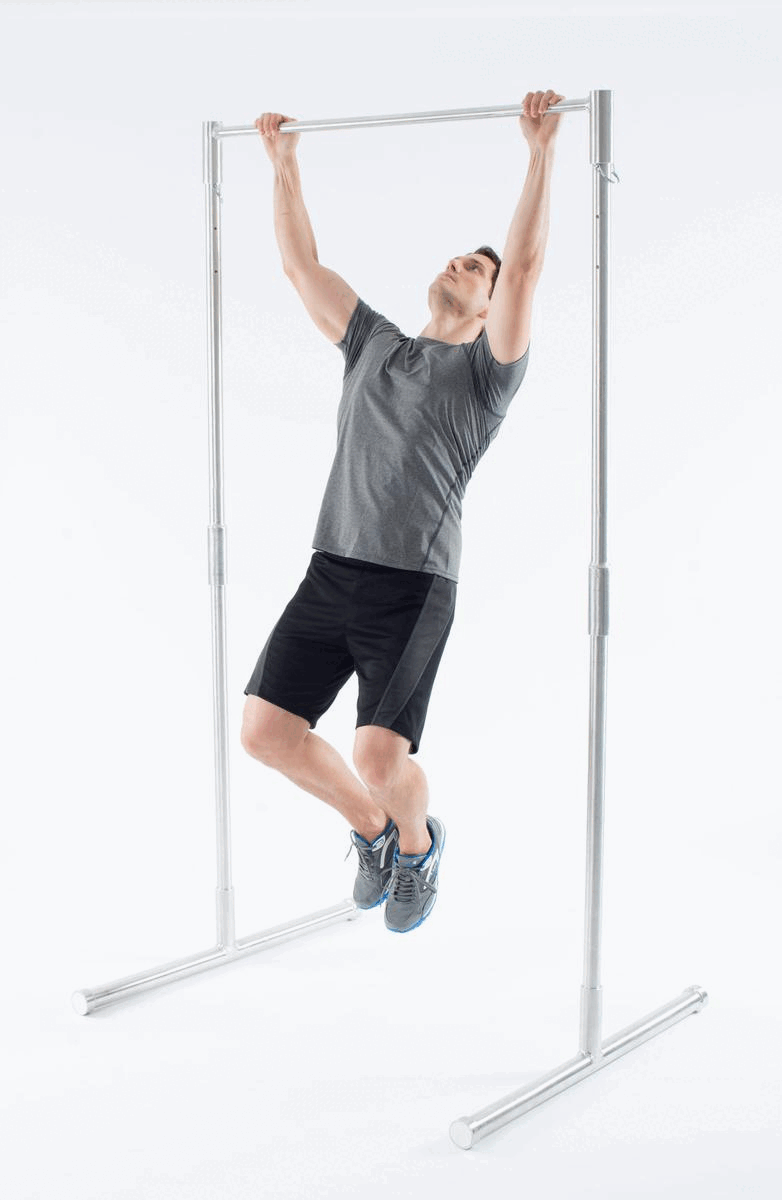
Now THIS is a pull-up. When you hook your hands over the bar so that the fingertips are pointing away from you, you take away nearly all the help that the biceps and chest can give to you. From hanging, the shoulders get the movement started, but from the middle of the rep to the top, it’s lat-city. This will make you feel weak and humble. It’s no easy task for the back to lift up your entire body weight. Just doing a single correct pull-up is a feat of strength that’s beyond the average person. If you can't manage one, don’t give up, keep practicing with a small support object or assisted pull-up machine.
There’s no faster way to strengthen the back than pull-ups, if you’re doing overhand grip! Bonus points if you also hook your thumb over the bar. This greatly reduces how much your forearm and biceps) can help and puts even more emphasis on the back. This is the power of the right grip. Just changing your thumb takes the exercise to the next level.

If you had to choose only 1 grip?
No mystery here, the Overhand grip is the only way to go when doing pull-ups. It’s tempting to have fun with the other grips because they don’t kick your butt so badly, but remember, the whole reason you’re working out is to get your butt kicked! A tough workout makes you feel small and weak in the moment but ends with you as a stronger, confident person. (Read more on this line of thought in this Pulse article).
The takeaway - details matter
We hope this article gives you a sense of how much a simple change of hand position can affect the results of your workout. Our philosophy at Kenzai is that if you’re putting aside the time and space to do a workout, why not focus-in and get the details right so that you wring every ounce of benefit out of it?
As you work through your resistance training, be curious, and be scientific. Experiment with different grips and pay close attention to which muscles are working, which are getting off easy, and how the effort level changes.
A better, more effective workout is just a twist of the wrist away!